Thursday, May 31, 2012

Theme Thursday: Monkeying Around

There's a reason monkey books are so prevalent. They're so freaking cute! I also can't believe I got through an entire monkey program with doing "5 Little Monkeys Jumping on the Bed." It was on my cheat sheet, but somehow I just skipped right over it. Luckily, there's enough awesome monkey stuff packed into the story time that I don't think anyone noticed.

Song: Good Morning Dear Earth

Flannel: When Cow Gets Up in the Morning

Song: Twinkle, Twinkle Little Star

Book: Just Mommy and Me by Tara Jaye Morrow

Finger Play: Turtle

Song: Head, Shoulders, Knees and Toes

Song: Grand Old Duke of York

Book:Tall by Jez Alborough

Flannel: Monkey Face

Song: The More We Get Together

Book: Monkey and Me by Emily Gravett
,


Song: Turn Around from Getting to know Myself


 Make and Take Craft: Monkey Puppets

Supplies:
-monkey faces (pattern here)
-popsicle sticks
-crayons
-pipe cleaners

Process:
Before story time, I glued the monkey heads to the Popsicle sticks. After story time, we met at the craft table and I handed out the puppets and 2 Popsicle sticks per person. As the kids colored the monkey faces, I showed the adults how to wrap the pipe cleaners around the stick to make bendable arms and legs.

Time: Prep took about 10 minutes and the craft took 20.


Tuesday, May 29, 2012

Up and Coming: Dream Journal

We're supplementing the outside summer reader performers this year by having librarians present a program of their own design at several different branches during the summer. I already had this program planned for my branch and I enjoy seeing what other branches are doing, so I volunteered to be one of the traveling librarians this summer.   

Using basic print making techniques and simple book binding, kids 7 and up will have a chance to create their very own notebook at four libraries around the city this summer. We're calling them Dream Journals since that fits the theme, but really these notebooks can be used for anything! 

I adapted a tutorial on printmaking that I found on Pinterest for the print portion, and my friend Joseph taught me how to do several different types of book binding my last semester of college; I was looking for a new way to recycle all the thesis drafts that I had lying around my apartment. I'll probably write another post on these notebooks once I've presented at a few branches, but for now here's a quick how-to for making your own dream journals.

Supplies:
-flat styrofoam (the bottoms of plates or the tops of old take-out containers work well)
-pencil
-sponge
-paint (I use tempera)
-manilla folder
-hole punch
-yarn
- blank paper, folded in half 

Sizing Your Notebook:
 Take one piece of the paper that you'll be using as the inside and fold it in half. Trace the half sheet of paper on the manilla folder, on the fold.  Cut out your traced rectangle making sure you don't cut the fold. Now you should have what appears to be a much smaller manilla folder, but is in actuality the cover for your new notebook.


Using Prints to Design the Cover:

Cut the Styrofoam into manageable sizes. My squares are about one square inch, but you can very easily go larger if you want more detail.


Using a pencil, press down and draw on the Styrofoam. If you're including words remember to write backwards since we're going to get a relief/mirror print. I made generic night time pictographs for my samples, but I'll take extra Styrofoam with me to the branches so the kids can add whatever they want.


Saturate the side of a sponge in paint. In a perfect world you would use printer's ink or acrylic paint, something that gets sticky and a roller. This is not a perfect world so I'm using tempera paint.


And dab the paint onto the print-block evenly


Place the print-block paint side down on the journal cover and press for a few seconds. Carefully peel it off the reveal the print underneath. Repeat as desired.


Putting the Notebook Together:
Take your stack of inside-the-notebook paper and fold it in half. Hole punch 5 evenly spaced holes down the side, on the fold. Using one sheet as a template, trace the 5 holes onto the cover of the notebook and punch those out as well. Now when you lay the cover and the paper flat on top of each other all 5 holes should line up perfectly.


And here's where I get way less talky and let the pictures speak for themselves. On the left you'll see the yarn being threaded to make the sample notebook and on the right you'll see the diagram of where the yarn is going in the picture. Be sure to leave a tail in the middle of the notebook and to pull your yarn tight each time it threads through a new hole.


And you've done it! You've made your very own notebook! Congratulations. Now go forth and fill it with your thoughts, hopes and DREAMS.


Friday, May 25, 2012

Flannel Friday: This Little Train

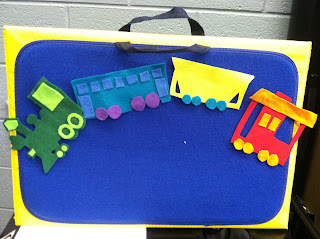
This is most definitely an "Inspired by Flannel Friday" post. A few weeks ago Roving Fiddlehead gave us a bunch of songs and rhymes to use in conjunction with the train templates that Melissa from Mel's Desk shared with us. I knew that I wanted to design my own pieces, so that my engine would match the crafts that the kids were making at the end of story time. Then the rest of the train cars had to match the engine and... you get the point. 


But I pondered for a long time which rhyme or song I would use. I settled on "This Little Train." The link that Roving Fiddlehead provides, to the BCSL Children's Wiki, was more than I wanted to navigate while I tried to fit planning story time in to the rest of my day, so I found this version and mixed and matched versions until I got one that worked for me.*


This little train
painted green
it goes chugging
full of steam


This little car
painted blue
it has seats
for me and you


This little car
painted yellow
see it shimmy
and shake like jello


This little car
painted red
it is headed
off to bed

With a choo, choo
toot, toot
hear the whistle blow
This little train goes chugging home.


*"Worked for me" might be an exaggeration. Not only did I forget the tune to "this Old Man" and have to ask for help from the other adults in the room, I also forgot what the red caboose was supposed to be doing. I ended up singing "He's not standing/ on his head."

UPDATE: Here are patterns for the train cars I made.

Thursday, May 24, 2012

Theme Thursday: Chugga Chugga Choo Choo

Happy Thursday Everybody! Last week we learned all about trains during story time.


Song: Good Morning Dear Earth


Song: We Clap and Say Hello


Flannel: Little Mouse, Little Mouse


Song: If You're Happy and You Know It


Rhyme: 10 Little Fingers


Book: Freight Train by Donald Crews


Finger Play: 2 Little Blackbirds


Song: Shake Your Sillies Out


Song: Move Your Body Along


Flannel: This Little Train


Book: Shark vs. Train by Chris Barton


Song: Itsy Bitsy Spider


Finger Play: Engine on the Track


Song: Turn Around


Make and Take Craft: Stand Alone Trains


I got this great idea for a story time craft from Recipe for Reading. It was a huge hit and one of my favorite crafts we've ever done!


Supplies:
-card stock train shapes (prepared beforehand)
-toilet paper tubes
-crayons


Process: To get ready, cut the toilet paper tubes into 4ths and then cut a slit, about halfway through, in each piece. Cut out your train shape on sturdy card stock so the train will stand up by itself and not flop around. After story time, I laid out crayons and the toilet paper tube wheels on the table, showed the caregivers as a group how to put the wheels on and then walked around and provided help as needed. The kids loved coloring the trains and it was one of the most successful crafts that we've done- developmentally it was appropriate, but there was still the extra flair from the toilet paper tube wheels that turned it into something more than just a uniquely shaped coloring sheet.


Time: I'm not going to lie, cutting shapes out of card stock was a pain. By the time I drew a train engine that I liked, it was pretty complex and I could only get my scissor through two pieces of the card stock at a time. My advice? Choose a simpler engine. Prep took about an hour, broken up throughout the day and the craft itself took about 20 minutes.